One-dimensional texturing and the texture matrix can be used to visualize the overall orientation of surface normals relative to a specific direction. One unexpected application of visualizing surface orientations is to optimize specific types of manufacturing processes.
Bailey and Clark [7] describe a manufacturing process for the automated fabrication of solid freeform objects. The process makes an abstract object ``real'' by laminating together sheet after sheet of paper with each sheet stacked on top of the previous sheet. Each sheet of paper corresponds to a thin layer in the object under construction. Before each lamination, a laser first cuts each sheet to the proper shape for its corresponding level within the object. The laser will also cut a crosshatch pattern in the region of the sheet not belonging to the object level. Later, the crosshatched regions will be brushed away as scrap from the final finished object.
The strength and surface quality of the object depend on the shape of the object and, importantly, how the object is oriented as the object is built from sheet after sheet of laser-cut paper. In particular, if the density of the contour lines formed from the layers of sheets is too low, the scrap paper becomes difficult remove and this adversely affects the quality of the object's surface in such regions. No orientation will eliminate completely the quality problems due to regions of low contour line density because changing the orientation to improve one region is bound to shift the problem to another region of the object. However, the quality of certain regions such as screw threads or other regions that closely join with another part are more important to manufacture precisely.
Because the manufacturing process is slow, iterating the manufacturing process until a good quality orientation is found is not a tenable option. Moreover, picking good orientations is difficult for people to eye-ball because of the difficulty visualizing contour line density.
Bailey and Clark devised a texture-based interactive rendering technique using OpenGL for visualizing the contour line density of a 3D model. The idea is to color-code regions of contour line as a red-yellow-green spectrum with low density regions coded red (indicating poor contour line density and likely to lead to quality issues) and high density regions colored green (indicating good contour line density). With this color visualization, a manufacturing engineer can then interactively orient the model on a computer workstation based on the contour line density color-coding and knowledge of process-dependent design rules to find a suitable orientation for manufacturing the object.
The rendering technique uses 1D texturing and the texture matrix to render the model color-coded as described. Interactive changes to the model orientation require no more effort than updating the texture matrix and re-rendering the static geometry of the model. Because the technique leverages OpenGL's per-vertex transform and texturing functionality, graphics hardware that accelerates OpenGL's transform functionality and texturing will automatically accelerate this rendering technique.
Assume a coordinate space for surface normals with the Z axis perpendicular to the way the paper sheets are stacked. If the object's surface normals are transformed to this coordinate space, the contour line density is purely a function of the Z component of the surface normal. Specifically, the contour line density is:
where t is the paper layer thickness, approximately 0.0042 inches.
The possible range of CLD can be color-coded as a red-yellow-green spectrum based on known design rules, and then the composite color-coded function can then be encoded in a 1D texture. In their particular case, Bailey and Clark found that a CLD below 100 causes problems for the manufacturing process. Therefore, the 1D texture would be set up to map a CLD below 100 to red.
Because t is a constant, CLD varies only with Nz. Typically, per-vertex surface normals are passed to OpenGL using glNormal3f() calls and such normals are used for lighting. For this rendering technique however, the normalized per-vertex surface normal is passed to glTexCoord3f() to serve as a 3D texture coordinate. Keep in mind that OpenGL transforms texture coordinates as 3D homogeneous values.
Then the texture matrix can be used to rotate this per-vertex surface normal (passed in to OpenGL as a 3D texture coordinate) to match the assumed coordinate space where the Z axis is perpendicular to the way the paper sheets are stacked. Because the normal Nis assumed to be normalized, Nz will vary from [-1,1]. Next, this rotated Nz component must be mapped to the s texture coordinate used for 1D texturing and scaled and biased to the [0,1] texture range. The rotation and scale and bias transformations are concatenated as shown:
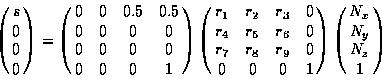
The composite of the rotate and scale and bias matrices can be loaded into the texture matrix like this:
  GLfloat scaleBias[16] = { 0,   0, 0, 0,  /* OpenGL wants column major */
                            0,   0, 0, 0,
                            0.5, 0, 0, 0,
                            0.5, 0, 0, 1 };
  glMatrixMode(GL_TEXTURE);
  glLoadIdentity();
  glMultMatrixf(&scaleBias[0]);
  glRotatef(angle, x, y, z);
By enabling texturing and binding to the 1D color-coded texture and rendering the model using glTexCoord3f() as described, the contour line density is effectively visualized. To re-render the model assuming a different orientation for the manufacturing process, simply adjust the texture matrix rotation and re-render the model's static geometry.
Note that there is no way to normalize a texture coordinate in the way that OpenGL supports GL_NORMALIZE for normalizing normals passed to glNormal3f(). Also if rendering the model involves modelview matrix changes, these modelview matrix changes must also be reflected in the texture matrix.
The NV_texgen_reflection_vector 8 extension addresses both these issues. The extension provides two new texture coordinate generation (texgen) mode. The GL_REFLECTION_MAP_NV mode can place the eye-space reflection vector coordinates in s, t, and r. The second mode is more interesting for the purpose at hand. The GL_NORMAL_MAP_NV mode can place the eye-space normal vector coordinates in s, t, and r. By using the GL_NORMAL_MAP_NV mode for the s, t, and r texture coordinates, you can use the technique described above, but simply call glNormal3f() instead of glTexCoord3f(). The GL_NORMALIZE functionality can be used to automatically normalize the per-vertex normals and modelview matrix changes are automatically accounted for.