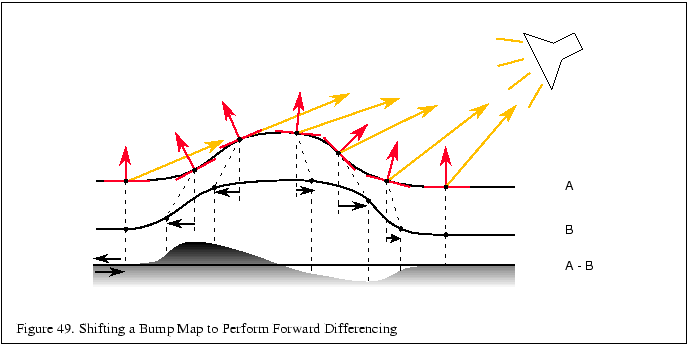
The first derivative of the height values of the bump map in a given
direction ![]() can be approximated by the following process:
can be approximated by the following process:
Consider a one dimensional bump map for simplicity. The map only varies
as a function of ![]() . Assuming that the height values of the bump map can
be represented as a height function
. Assuming that the height values of the bump map can
be represented as a height function ![]() , then the three step
process above would be the following:
, then the three step
process above would be the following:
![]() . If the
delta is one texel in
. If the
delta is one texel in ![]() , then the resulting texture coordinate is
, then the resulting texture coordinate is
![]() , where
, where ![]() is the width of the texture in
texels. This operation implements a forward difference of
is the width of the texture in
texels. This operation implements a forward difference of ![]() , which
would approximate the first derivative of
, which
would approximate the first derivative of ![]() if
if ![]() was continuous.
was continuous.

In the two dimensional case, the height function is ![]() , and performing
the forward difference in the direction of
, and performing
the forward difference in the direction of ![]() evaluates the
derivative of
evaluates the
derivative of ![]() in the direction
in the direction ![]() . This technique is
also used to create embossed images.
. This technique is
also used to create embossed images.
This operation provides the values used for the first two addends
shown in Equation 1. In order to provide
the third addend of the dot product, the process needs to compute and
add the transformed ![]() component of the light vector. The tangent space
transform in Equation 2 implies that the
transformed
component of the light vector. The tangent space
transform in Equation 2 implies that the
transformed ![]() component of
component of ![]() is simply the inner product of the
vertex normal and the light vector,
is simply the inner product of the
vertex normal and the light vector, ![]() . Therefore, the
. Therefore, the
![]() component can be computed using OpenGL to evaluate the diffuse
lighting term at each vertex. This computation is performed as a second pass,
adding to the previous results.
component can be computed using OpenGL to evaluate the diffuse
lighting term at each vertex. This computation is performed as a second pass,
adding to the previous results.

The steps for diffuse bump mapping are the following:
Using the accumulation buffer can improve the accuracy of this technique. The bump mapped objects in the scene are rendered with the bump map, re-rendered with the shifted bump map and accumulated with a negative weight, then re-rendered again using Gouraud shading and no bump map texture, accumulated normally.
The process can also be extended to find bump mapped specular highlights. The
process is repeated using the halfway vector (![]() ) instead
of the light vector. The halfway vector is computed by averaging the
light and viewer vectors
) instead
of the light vector. The halfway vector is computed by averaging the
light and viewer vectors
![]() . The combination
of the forward difference of the bump map in the direction of the
tangent space
. The combination
of the forward difference of the bump map in the direction of the
tangent space ![]() and the
and the ![]() component of
component of ![]() approximate
approximate ![]() .
Here are the steps for computing
.
Here are the steps for computing
![]() :
:
The result must be raised to the shininess exponent before blending.
One technique for performing this exponential is to use the texture
color table extension to perform a table lookup on the results of
![]() . Invoke
glColorTableSGI() with GL_ TEXTURE_COLOR_TABLE_SGI as
its target, then enable GL_ TEXTURE_COLOR_TABLE_SGI. Copy the
image calculated above from framebuffer memory into texture, using
glCopyTexImage2D(). Finally, apply a projective texture transformation
or calculate texture coordinates so that the specular component is
mapped onto the object with the same screen coordinates in which it
was drawn. Pixels copied from other objects drawn will not fall on the
bump mapped object and will be discarded. It is a good idea to copy
only the rectangular screen region that bounds the bump-mapped object
if the application supports this. If the texture color table extension
is not available, it may be possible to use glReadPixels(), glTexSubImage2D(), apply the exponent on the host, and still retain interactivity
for small regions.
. Invoke
glColorTableSGI() with GL_ TEXTURE_COLOR_TABLE_SGI as
its target, then enable GL_ TEXTURE_COLOR_TABLE_SGI. Copy the
image calculated above from framebuffer memory into texture, using
glCopyTexImage2D(). Finally, apply a projective texture transformation
or calculate texture coordinates so that the specular component is
mapped onto the object with the same screen coordinates in which it
was drawn. Pixels copied from other objects drawn will not fall on the
bump mapped object and will be discarded. It is a good idea to copy
only the rectangular screen region that bounds the bump-mapped object
if the application supports this. If the texture color table extension
is not available, it may be possible to use glReadPixels(), glTexSubImage2D(), apply the exponent on the host, and still retain interactivity
for small regions.
Another possibility is to use glCopyPixels() with a color table configured with glPixelMap(). The bump mapped object can be applied to the stencil buffer to create a mask so that only the pixels covered by the bump mapped object are applied to the framebuffer.
Finally, use blending during the application of the specular component to add to the diffuse component and complete the lighting equation.